Introduction
In modern lighting systems, the photocell plays a crucial role as an intelligent sensor, contributing significantly to improving energy efficiency and optimizing lighting control.
The photocell has the ability to automatically adjust electrical devices based on ambient light levels, providing the most suitable lighting solutions for different scenarios. With its widespread application in outdoor and street lighting, understanding how to correctly wire the photocell becomes a key step in ensuring the proper operation of lighting systems.
Therefore, this article will delve into the importance of the Photocell Wiring Diagram, providing detailed guidance to enable readers to connect photocells correctly and effectively. Let’s explore this critical topic that directly impacts lighting efficiency.
Photocell Working Principle
A photocell adjusts electrical devices based on surrounding light levels. Inside, a photosensitive resistor changes its resistance with light intensity: more resistance in the dark, less in brightness. The lighting system’s control circuit detects this variation, triggering adjustments. Outdoors, the photocell’s vital role includes automatic sensing of sunrise and sunset, intelligently managing night illumination and daytime shutdown. This not only efficiently conserves energy but also enhances system reliability.
In modern lighting design, the photocell’s fundamental principle is critical for intelligent lighting and improved energy efficiency. Its automatic adjustments contribute to creating flexible, intelligent outdoor environments, ensuring more comfortable and secure spaces.
The Significance of the Photocell Wiring Diagram
A well-crafted Photocell Wiring Diagram is essential for the proper functioning of lighting systems. It serves as the foundation for installation, debugging, and maintenance, ensuring a correct connection of the photocell with electrical components. This accurate diagram enables the system to sense light changes and make adjustments, facilitating intelligent dimming and automatic switching.
Key Aspects:
Smooth System Operation:
The detailed wiring diagram provides clarity on each electrical component and connection, enabling accurate linking of the photocell with power sources and lighting fixtures.
Correct connections are crucial for the system to operate as expected, implementing functions like intelligent dimming and automatic switching.
Avoiding Potential Issues:
Incorrect wiring may lead to electrical faults and abnormal operation of lighting fixtures.
A well-designed wiring diagram acts as a preventive measure, reducing the likelihood of system failures caused by connection errors and lowering repair costs.
In summary, a clear and accurate Photocell Wiring Diagram is indispensable for ensuring the smooth operation and maintenance of lighting systems, making it a crucial element in their design, installation, and maintenance.
Types for photocells
The classification of photocells includes the following types: 1. Wiring Type 2. Twist-Lock Type 3. Lamp-Holder Type.
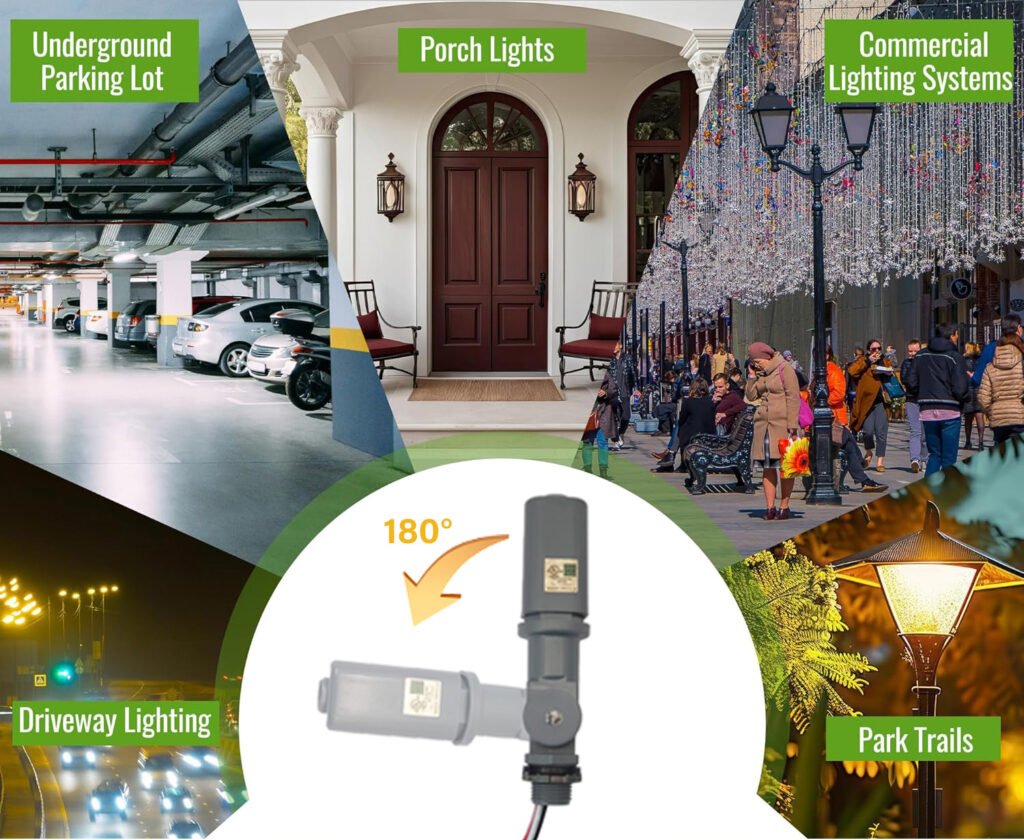
Wiring Type Photocell: This type of photocell is commonly employed in household outdoor fixtures such as porch lights, garden lights, and wall sconces. Through simple wiring connections, the photocell intelligently senses the ambient light levels and automatically adjusts the brightness of the light fixtures. This enhances the intelligence and efficiency of outdoor lighting in residential spaces.
Twist-Lock Type Photocell: Twist-lock type photocells are mainly used for controlling electrical boxes and streetlights. Their design allows them to be securely fastened in a predetermined position, ensuring accurate sensing of light changes in specific directions and angles. This makes twist-lock photocells an ideal choice for controlling large-scale lighting systems, including streetlights and parking lot fixtures.
Lamp-Holder Type Photocell: This type of photocell is specifically designed for connecting outdoor light bulbs, such as street lamps and outdoor fixtures. By being directly integrated into the lamp head, the photocell intelligently senses changes in ambient light and automatically controls the activation and deactivation of the light bulb. Lamp-head type photocells play a crucial role in outdoor lighting, enhancing the intelligence and energy efficiency of the fixtures.
These three types of photocells cater to diverse lighting fixtures and applications, providing users with flexible and intelligent lighting control options.
Wiring steps
Safety Precautions:
Ensuring safety is paramount when undertaking any electrical work. Here are some recommendations to emphasize safety during electrical work:
Power Off Procedures: Before commencing any electrical repairs, installations, or troubleshooting, always disconnect the relevant power sources. Ensure that the power is completely switched off to minimize the risk of electric shock and fire hazards.
Wear Personal Protective Equipment: Use appropriate personal protective equipment, including insulated gloves, safety goggles, and protective clothing. This helps to minimize the possibility of injury.
Avoid Damp Environments: Try to avoid conducting electrical work in damp environments, as moisture can increase the risk of electric shock. If working in a moist area, ensure the use of waterproof equipment and tools.
Familiarize Yourself with Circuit Layouts: Before undertaking any electrical work, familiarize yourself with the layout and components of the relevant circuits. Understand the location of power sources, switches, distribution panels, and how to operate them correctly.
Prevent Overloads: Ensure that electrical equipment operates within its capacity to prevent power overloads, wire overheating, or equipment damage. Calculate loads reasonably and ensure that equipment operates within safe limits.
Seek Professional Help if Uncertain: If you have any doubts or uncertainties about electrical work, it is strongly recommended to seek the assistance of a professional electrical engineer. Professional technical support ensures the accuracy and safety of the work.
Regularly Maintain Equipment: Conduct regular inspections and maintenance of electrical equipment to ensure that cables, sockets, switches, and other components are in good condition. Any damage or issues discovered should be promptly addressed.
Use Extension Cords Wisely: Avoid prolonged use of overloaded extension cords. Use extension cords with suitable load capacities and ensure they receive proper ventilation to reduce the risk of fire.
By adhering to these safety precautions, the risks of accidents during electrical work can be significantly minimized. Electrical work requires caution and expertise to ensure the safety of operators and the surrounding environment.
Identify the wires:
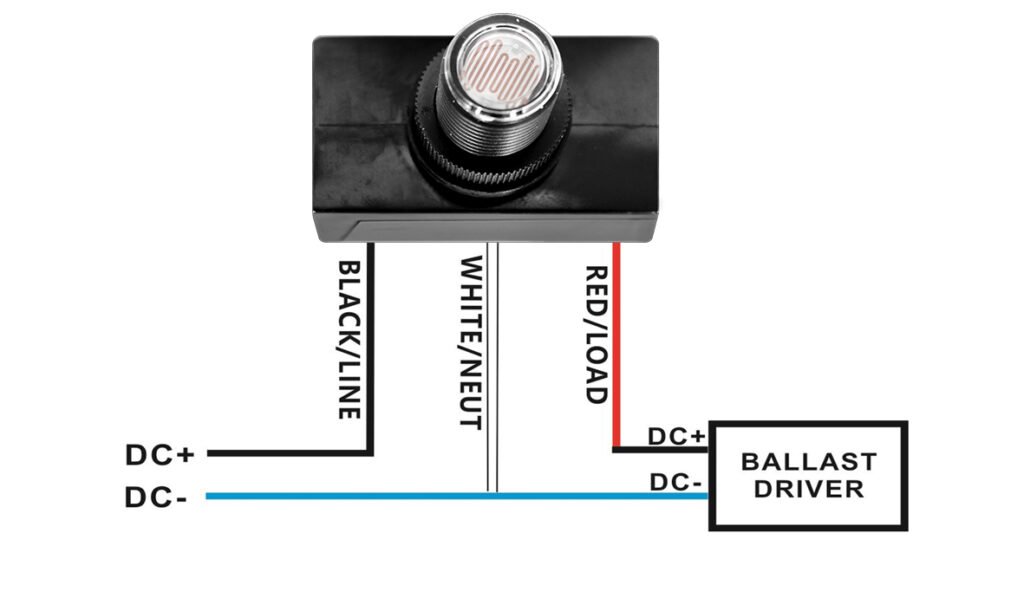
Understanding the color-coded wires is crucial. Typically, black represents the line (live) wire, white denotes the load (neutral) wire, and red indicates the load wire.
Brown Wire/Pink Wire/ Orange Wire/Purple Wire are dimming wire.
Red Wire: Load Line
Connect the red wire to the ballast or driver in the lighting system.
White Wire: Neutral line
The white wire is split into two by wire connectors, with one end connected to the neutral wire of the power system, and the other end linked to the driver or ballast.
Black Wire: Live line
The black wire can serve as an additional live wire or for specific applications based on your electrical system. Connect it accordingly.
Brown Wire/Pink Wire/ Orange Wire/Purple Wire: dimming line(0-10V Dimming & Dali Dimming)
Dimming line is mainly used to connnect the DIM- & DIM+on the ballast and driver.
Photocell Wiring Diagram:
Wire-in Photocell Wiring Diagram
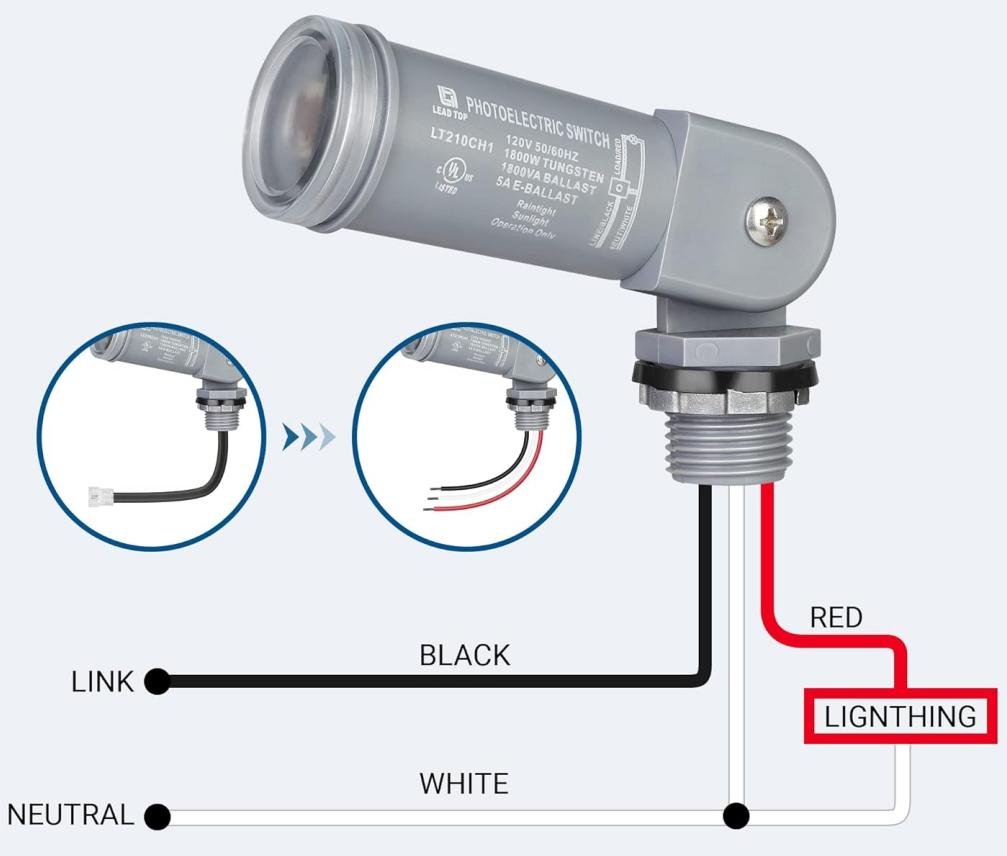
Twist-Lock Photocell Wiring Diagram
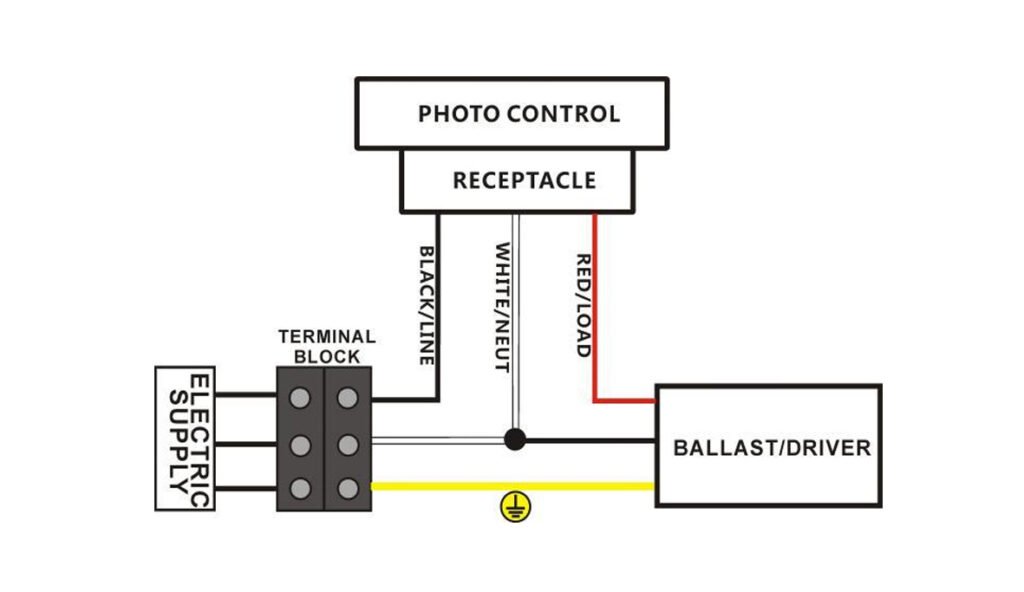
(Only two dimming wires will be used, not four at the same time. Two wires are connected to 0-10V dimming, and two wires are Dali dimmable)
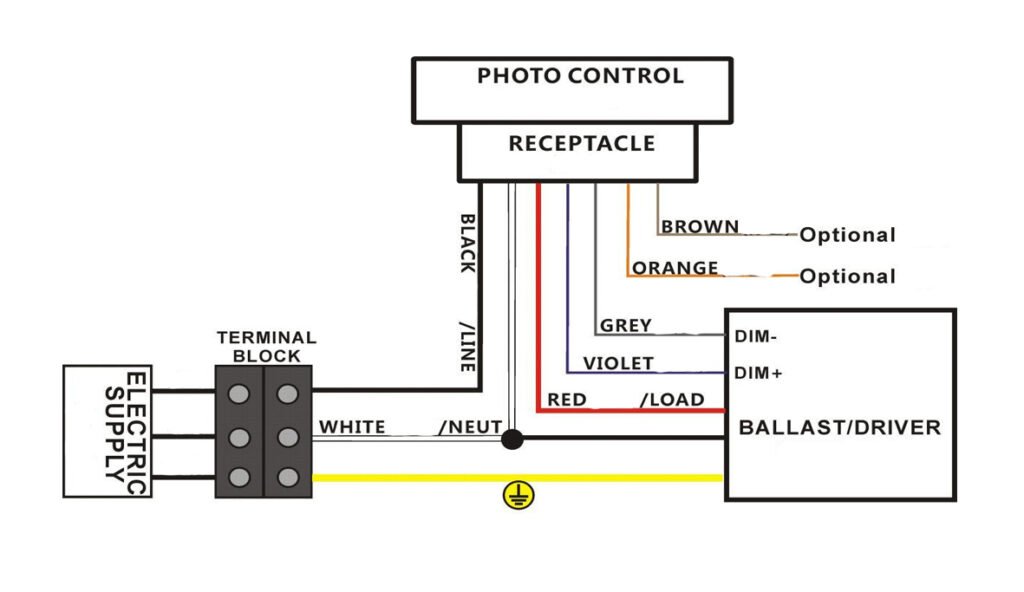
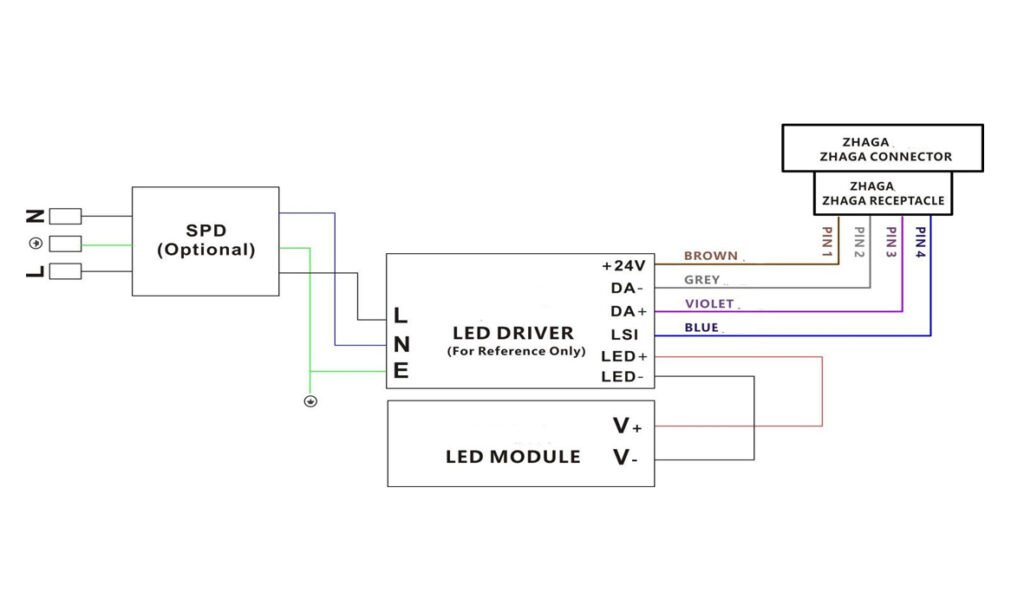
Lamp-Holder Type Photocell Wiring Diagram

Testing Installation:
Testing the installation of a photocell is a crucial step to ensure its proper functioning in controlling lighting based on ambient light levels. Here is a guide for testing the installation of a photocell:
Power Off:
Before conducting any testing, ensure that the power to the lighting circuit is turned off. This is a fundamental safety precaution.
Verify Wiring Connections:
Check the wiring connections to ensure they match the appropriate terminals on the photocell.
Confirm that the wiring is secure and properly insulated to prevent any electrical hazards.
Orientation Check:
Verify the orientation of the photocell. Some photocells have specific directional requirements to accurately sense ambient light changes.
Power On:
Turn on the power to the lighting circuit and observe the photocell’s response.
The photocell should react to changes in ambient light by either turning the connected lights on or off, depending on the lighting conditions.
Test in Various Light Conditions:
Cover the photocell with an opaque material (e.g., tape or cloth) to simulate darkness and observe if the connected lights turn on.
Expose the photocell to bright light, such as a flashlight, to simulate daylight, and observe if the lights turn off.
Adjustment Settings (if applicable):
If the photocell has adjustable settings, such as sensitivity or delay, experiment with these settings to ensure they function as intended.
Check for Unwanted Light Sources:
Ensure that no unwanted light sources, such as nearby streetlights or reflective surfaces, are influencing the photocell’s operation.
Inspect for Physical Obstructions:
Check for any physical obstructions or debris that might be obstructing the photocell’s sensor. Clear any such obstructions.
Documentation:
Keep a record of the testing process, including any adjustments made and observations of the photocell’s performance.
Professional Assistance (if needed):
If the photocell does not function as expected or if there are uncertainties during the testing process, seek assistance from a qualified electrician or technician.
By systematically testing the installation of the photocell, you can identify and address any issues, ensuring reliable and efficient operation in controlling the connected lighting.
Troubleshooting Tips:
Photocell troubleshooting is essential to identify and address any issues that may arise in the operation of the photocell-controlled lighting system. Here are some troubleshooting tips for dealing with common problems:
Check Power Supply:
Ensure that the power supply to the photocell is active. Verify that the circuit breaker or fuse protecting the photocell is not tripped.
Inspect Wiring Connections:
Examine the wiring connections to the photocell and ensure they are secure and properly insulated. Loose or damaged wires can disrupt the functionality.
Clean the Photocell:
Dust, dirt, or other contaminants on the photocell’s sensor can affect its performance. Clean the photocell carefully with a soft, dry cloth.
Verify Orientation:
Confirm that the photocell is installed with the correct orientation. Some photocells have specific requirements for facing certain directions.
Test in Different Light Conditions:
Observe the photocell’s response in various light conditions. Covering the photocell to simulate darkness or exposing it to a bright light source can help diagnose sensitivity issues.
Check for Obstructions:
Ensure that there are no physical obstructions blocking the photocell’s sensor. Remove any debris or objects that may be interfering with its operation.
Inspect Surrounding Light Sources:
External light sources, such as nearby streetlights or reflective surfaces, may impact the photocell’s accuracy. Adjust the photocell or shield it from unwanted light.
Evaluate Adjustable Settings:
If the photocell has adjustable settings, such as sensitivity or delay, experiment with these settings to see if they resolve the issue.
Inspect for Physical Damage:
Examine the photocell for any signs of physical damage. Cracks, exposed wires, or other damage may require replacement.
Check for Faulty Fixtures:
Test the connected light fixtures independently to ensure they are functioning correctly. A malfunctioning fixture can affect the overall system performance.
Consult Manufacturer’s Documentation:
Refer to the manufacturer’s documentation for specific troubleshooting guidelines and recommended solutions.
Professional Assistance:
If troubleshooting steps do not resolve the issue, or if there are uncertainties, seek assistance from a qualified electrician or technician for a more in-depth evaluation.
By systematically troubleshooting the photocell and addressing any identified issues, you can ensure the reliable and efficient operation of the lighting control system.




One Response